The Raspberry Pi Pico is a versatile microcontroller with a range of built-in peripherals, including an internal temperature sensor. This sensor provides readings of the chip’s internal temperature, which can be helpful for monitoring its operating conditions. In this article, we’ll walk you through the steps to read the Pico’s internal temperature using MicroPython, interpret the sensor values, and print the results in a human-readable format.
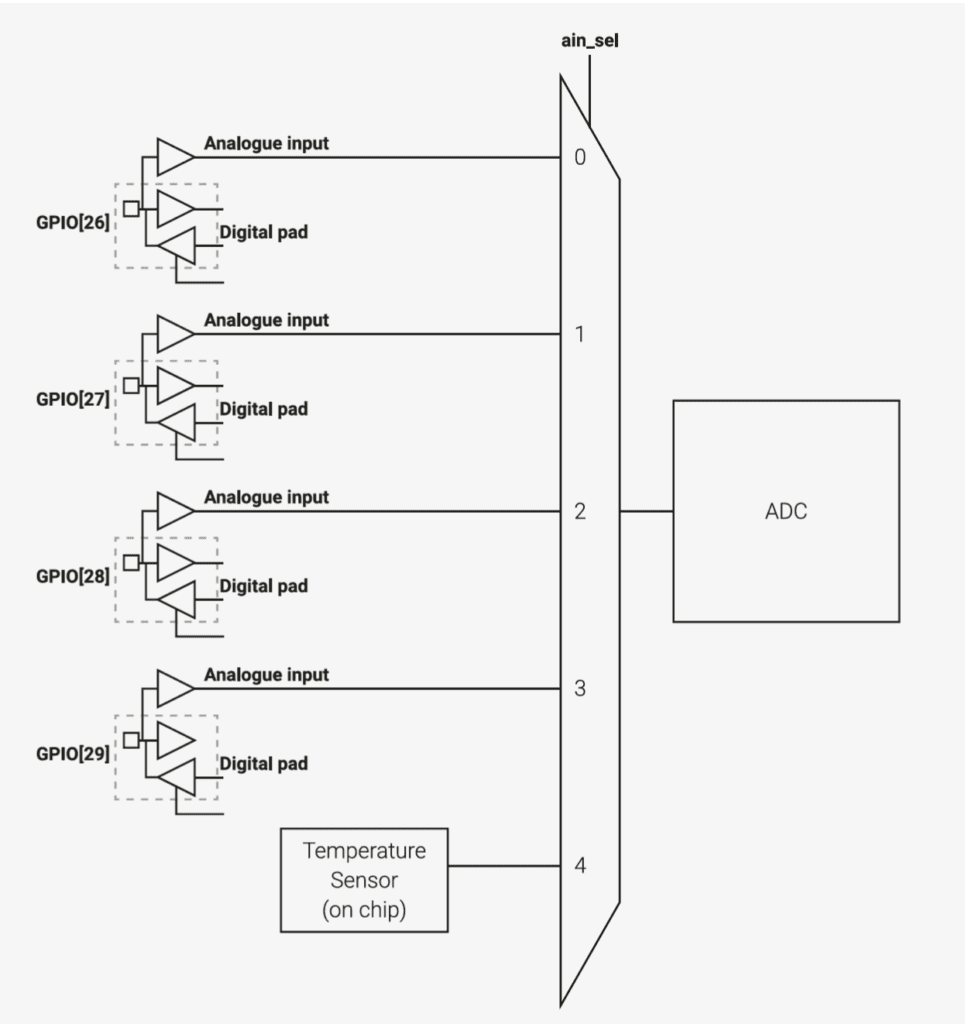
The Raspberry Pi RP2040 microcontroller, which powers the Raspberry Pi Pico, includes an internal temperature sensor primarily used to monitor the chip’s own temperature. This sensor can be accessed via the analog-to-digital converter (ADC) Channel 4 as shown below and provides a raw voltage output that corresponds to the internal temperature.

Why Monitor the Temperature?
Monitoring the microcontroller’s temperature can be useful in embedded systems for several reasons:
- Thermal Management: Helps in ensuring that the microcontroller is operating within safe thermal limits.
- Performance Monitoring: Can indicate if the device is experiencing conditions that may affect performance.
- Fault Detection: Unexpected temperature rises may suggest issues, such as a faulty power supply or increased power consumption.
While the internal temperature sensor is mainly for monitoring the microcontroller’s own operating temperature, it can be a useful metric in various projects.
Step 1: Setting Up MicroPython on the Pico
If you haven’t already, you need to install MicroPython on your Raspberry Pi Pico. Follow these steps:
- Download the latest MicroPython firmware for the Pico from the official MicroPython site.
- Hold down the
BOOTSELbutton on the Pico and connect it to your computer via USB. - When the Pico appears as a USB drive, drag and drop the downloaded
.uf2firmware file onto it. - The Pico will reboot into MicroPython, and you’re ready to start coding.
Step 2: Connecting to the Pico with Thonny
- Open the Thonny IDE (or any other compatible MicroPython editor).
- Select
MicroPython (Raspberry Pi Pico)from the interpreter options. - Connect to the Pico by clicking on
Run -> Select Interpreter -> MicroPython (Raspberry Pi Pico)and selecting the correct USB port.
Step 3: Writing the MicroPython Code to Read the Temperature
With MicroPython installed and Thonny connected, let’s write a script to read and display the internal temperature.
Code to Read the Temperature Sensor
The temperature sensor is mapped to ADC4 in the RP2040 microcontroller. The following code reads from this ADC channel, converts the value to Celsius, and prints it out.
import machine
import utime

# Initialize ADC for the temperature sensor (ADC4)
temp_sensor = machine.ADC(4)

# Constants from the RP2040 datasheet
VREF = 3.3  # Reference voltage for the ADC
ADC_RESOLUTION = 65535  # 16-bit ADC resolution
TEMPERATURE_SLOPE = -1.721  # Slope for temperature conversion (datasheet)
TEMPERATURE_OFFSET = 27  # Temperature offset at 0.706V (datasheet)

def read_internal_temperature():
    # Read the raw ADC value
    raw_value = temp_sensor.read_u16()

    # Convert raw value to voltage
    voltage = (raw_value / ADC_RESOLUTION) * VREF

    # Calculate temperature in Celsius using the RP2040 formula
    temperature_celsius = TEMPERATURE_OFFSET - (voltage - 0.706) / TEMPERATURE_SLOPE

    return temperature_celsius

# Loop to continually read and print the temperature
while True:
    temp = read_internal_temperature()
    print("Internal Temperature: {:.2f}°C".format(temp))
    utime.sleep(1)  # Read temperature every second
Explanation of the Code
- ADC Setup: We initialize the ADC with
ADC(4), as the internal temperature sensor is connected to this channel. - Voltage Conversion: The
read_u16()method read a 16-bit ADC value. We convert this value into voltage by dividing by the ADC resolution (65535) and multiplying by the reference voltage (3.3V). - Temperature Conversion: The RP2040 datasheet provides a formula for converting this voltage to Celsius:

- Offset: The sensor is calibrated to read 27°C at 0.706V.
- Slope: For each volt, the temperature decreases by approximately 1.721°C.
Step 4: Running the Code
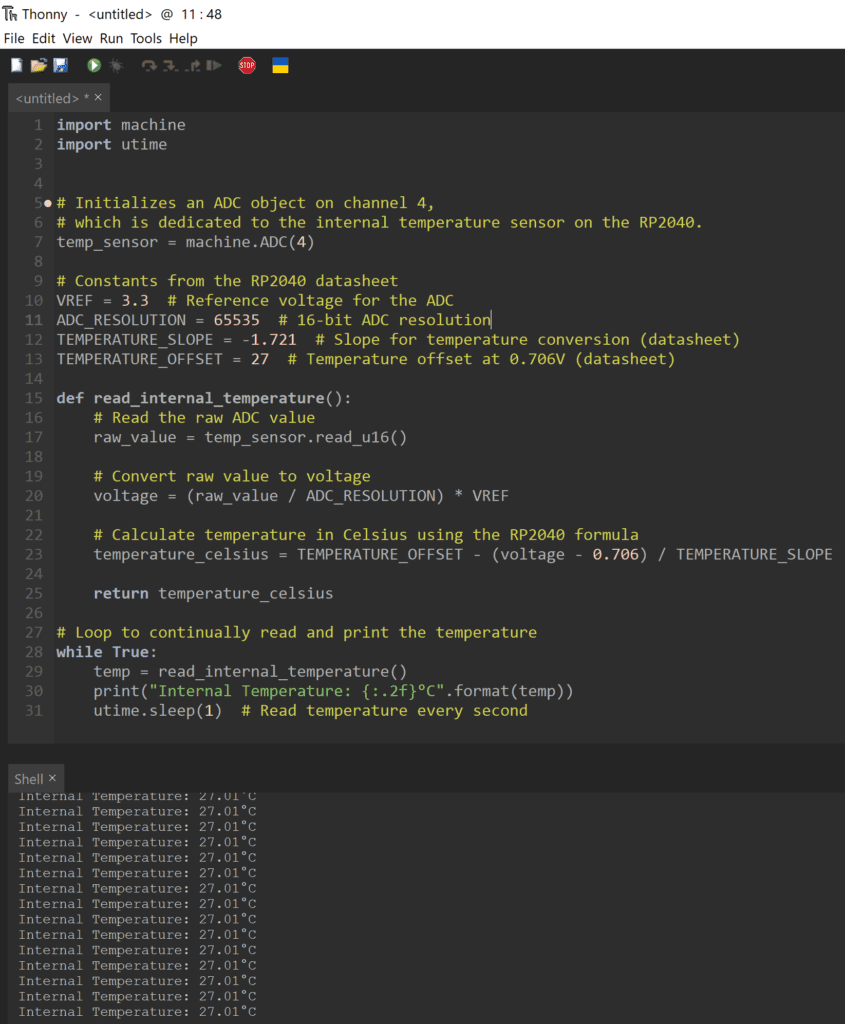
Copy the code into Thonny, save it to the Pico, and click Run. The temperature readings should start displaying in the console, refreshing every second.
Example Output
The console will print:

The values may fluctuate slightly due to environmental factors and the chip’s operational state.
Tips for Accurate Readings
- Note on Accuracy: The internal sensor is primarily intended to monitor the chip’s operating temperature rather than ambient temperature. If you need precise ambient temperature readings, consider using an external temperature sensor.
- Ambient Calibration: For applications requiring more accurate ambient temperature, you may want to calibrate the reading by measuring the difference between the Pico’s reading and a known, reliable ambient temperature.
How to Use read_u16() with 12-bit Resolution
The read_u16() function returns a 16-bit number. Since the RP2040 only has a 12-bit ADC, this function essentially scales up the 12-bit value by left-shifting it, padding it to 16 bits. To convert this back to a 12-bit scale, divide by 16.
So, if read_u16() returns a value between 0 and 65535, the actual 12-bit reading is:
pythonCopy coderaw_value_12bit = raw_value_16bit // 16Voltage Conversion Formula
With this in mind, your voltage calculation will look like this:
# Constants
VREF = 3.3  # Reference voltage in volts
ADC_RESOLUTION = 4095  # 12-bit resolution for the RP2040's ADC

# Read the raw 16-bit ADC value
raw_value_16bit = temp_sensor.read_u16()

# Convert the 16-bit value to 12-bit
raw_value_12bit = raw_value_16bit // 16

# Calculate voltage based on the 12-bit resolution
voltage = (raw_value_12bit / ADC_RESOLUTION) * VREF
Explanation of the Formula
- Convert:
raw_value_12bit = raw_value_16bit // 16adjusts theread_u16()output to a 12-bit scale. - Voltage Conversion:
(raw_value_12bit / ADC_RESOLUTION) * VREFaccurately converts this 12-bit reading to voltage.
Complete Temperature Calculation
Finally, to get the temperature in Celsius, you can use the converted voltage in the temperature formula:
# Temperature conversion constants
TEMPERATURE_OFFSET = 27  # Known temperature offset in Celsius
TEMPERATURE_SLOPE = -1.721  # Voltage change per degree Celsius

# Calculate temperature in Celsius
temperature_celsius = TEMPERATURE_OFFSET - (voltage - 0.706) / TEMPERATURE_SLOPE
Updated Code>>
import machine
import utime

# Initialize ADC for the temperature sensor (ADC4)
temp_sensor = machine.ADC(4)

# Constants from the RP2040 datasheet
VREF = 3.3  # Reference voltage for the ADC
ADC_RESOLUTION = 4095  # 12-bit ADC resolution (0 to 4095)
TEMPERATURE_SLOPE = -1.721  # Slope for temperature conversion (datasheet)
TEMPERATURE_OFFSET = 27  # Temperature offset at 0.706V (datasheet)

def read_internal_temperature():
    # Read the raw ADC value (16-bit)
    raw_value = temp_sensor.read_u16()

    # Convert raw 16-bit value to 12-bit
    raw_value_12bit = raw_value // 16  # Scale down to 12 bits

    # Convert raw value to voltage
    voltage = (raw_value_12bit / ADC_RESOLUTION) * VREF

    # Calculate temperature in Celsius using the RP2040 formula
    temperature_celsius = TEMPERATURE_OFFSET - (voltage - 0.706) / TEMPERATURE_SLOPE

    return temperature_celsius

# Loop to continually read and print the temperature
while True:
    temp = read_internal_temperature()
    print("Internal Temperature: {:.2f}°C".format(temp))
    utime.sleep(1)  # Read temperature every second
Key Changes Made
- ADC Resolution: The
ADC_RESOLUTIONconstant has been updated to 4095 to reflect the true 12-bit resolution of the RP2040 ADC. - Conversion of Raw Value: The raw value read from the sensor is converted from a 16-bit scale to a 12-bit scale using
raw_value_12bit = raw_value // 16. - Voltage Calculation: The voltage calculation now uses the adjusted 12-bit raw value to ensure accurate conversion.
How It Works
- The
read_u16()function reads a value that may appear to be up to 65535 due to the 16-bit output, but we are treating it as a scaled 12-bit value. - The final temperature calculation now accurately reflects the temperature in Celsius based on the internal ADC readings.
Conclusion
Reading the internal temperature of the Raspberry Pi Pico is straightforward with MicroPython. By accessing the ADC4 channel and applying the conversion formula, you can get an approximate measurement of the chip’s operating temperature. This can be a useful metric for monitoring your device in embedded applications, giving you insight into its thermal performance and operating conditions.


