Introduction to HC-SR04
The HC-SR04 is a popular ultrasonic sensor used for measuring distance. It works by emitting an ultrasonic sound wave and measuring the time it takes for the sound to bounce back from the object in front of it. This makes it a reliable and accurate sensor for projects that require distance measurement, like robotics or automation.
The HC-SR04 sensor consists of two main parts:
- Transmitter: Emits ultrasonic pulses.
- Receiver: Receives the echoes of the emitted pulses.
The time taken for the pulse to return to the receiver is used to calculate the distance of an object. It is commonly used with microcontrollers like Arduino or Raspberry Pi Pico for projects that require real-time distance measurements.
Components List
To interface the HC-SR04 with a Raspberry Pi Pico and measure the distance, you will need the following components:
- Raspberry Pi Pico
- HC-SR04 Ultrasonic Sensor
- Jumper Wires
- Breadboard (optional)
- External Power Supply (if necessary)
Pinout of HC-SR04 Sensor:
- VCC: Power supply pin (usually 5V)
- Trig: Trigger pin to initiate the measurement
- Echo: Echo pin that outputs the time for the sound wave to return
- GND: Ground pin
Raspberry Pi Pico Pinout:
- GP14 (GPIO14): Trigger pin
- GP15 (GPIO15): Echo pin
Raspberry Pi Pico Pinout
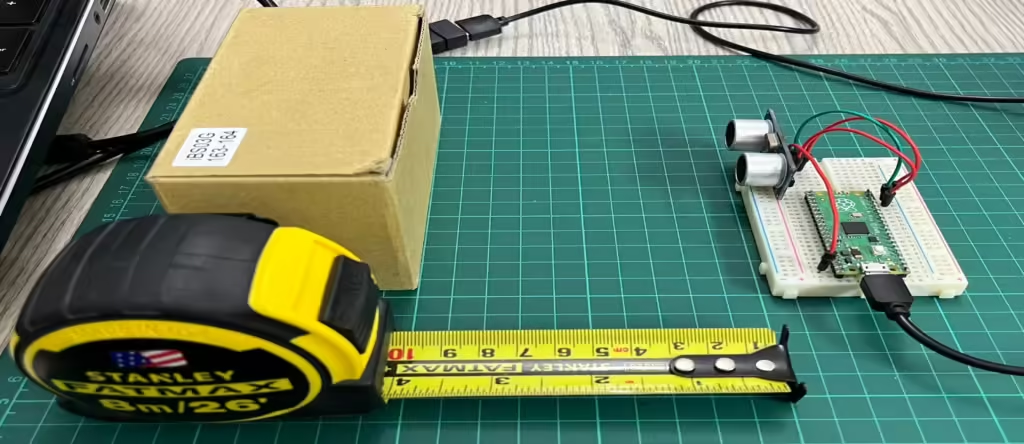
Overall Hardware Setup
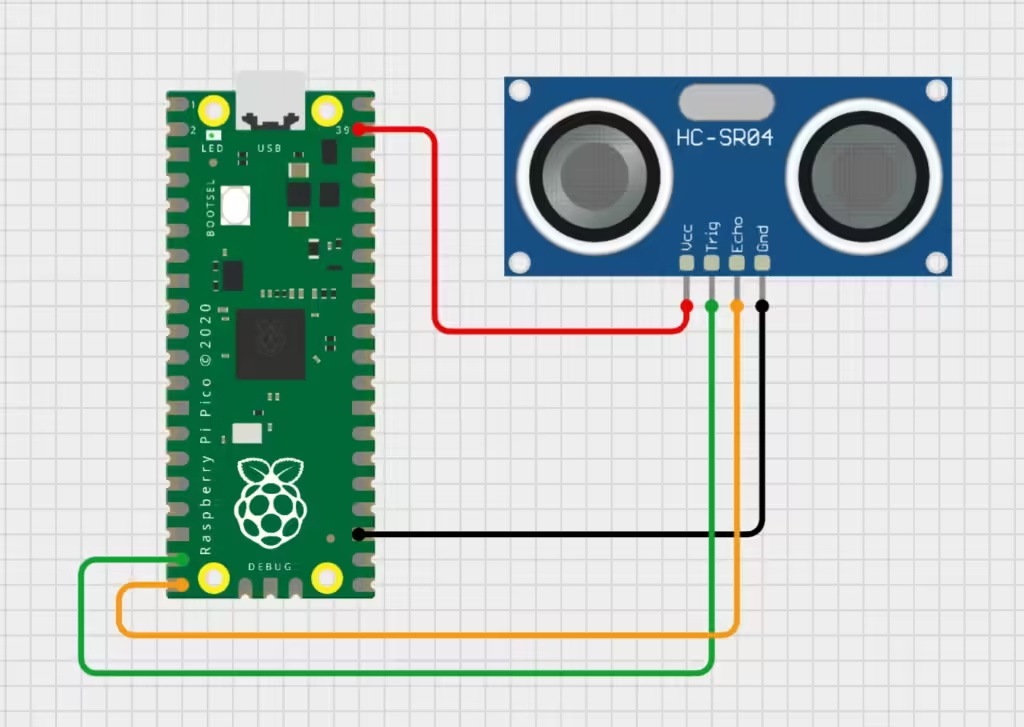
Wiring the HC-SR04 to the Raspberry Pi Pico
Here’s how to connect the HC-SR04 ultrasonic sensor to the Raspberry Pi Pico:
- VCC to 3.3V on the Raspberry Pi Pico (You can also use 5V, but 3.3V is safer for the Pico).
- Trig to GP14 (GPIO14) on the Pico.
- Echo to GP15 (GPIO15) on the Pico.
- GND to GND on the Pico.
Writing the Code
In this project, we’ll write a Python program to trigger the HC-SR04 and calculate the distance based on the echo time. The program will then output the distance in millimeters (mm) to the Raspberry Pi Pico’s serial monitor.
Step-by-Step Code Explanation
First, make sure you have the necessary software setup:
- Thonny Python IDE: Install and use this to write and upload Python scripts to the Raspberry Pi Pico.
- MicroPython: Make sure the Raspberry Pi Pico is running MicroPython.
The Code
from machine import Pin, time_pulse_us
import time

# Set up the GPIO pins for Trig and Echo
trigger = Pin(14, Pin.OUT)
echo = Pin(15, Pin.IN)

def get_distance():
    # Send a pulse to the Trig pin to trigger the ultrasonic sensor
    trigger.value(0)
    time.sleep_us(2)  # Small delay
    trigger.value(1)
    time.sleep_us(10)  # Trigger pulse duration
    trigger.value(0)

    # Measure the time taken for the echo to return
    duration = time_pulse_us(echo, 1)

    if duration == -1:
        return None  # No echo detected

    # Calculate the distance in inches
    # Speed of sound is approximately 13558.2677 inches per second (at room temperature)
    distance = (duration * 13558.2677) / 1000000  # Convert microseconds to seconds
    distance = distance / 2  # Divide by 2 for the one-way distance
    return distance

# Main loop to measure and print the distance in inches
while True:
    distance = get_distance()
    if distance is None:
        print("No Echo detected.")
    else:
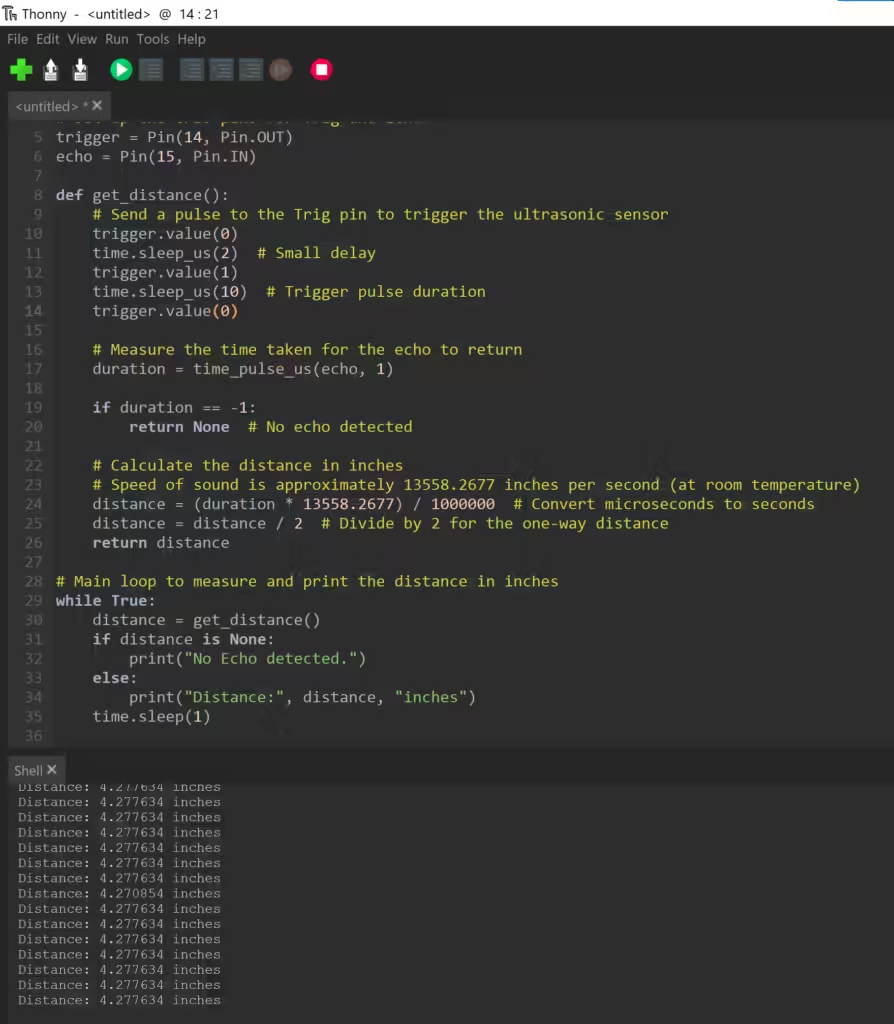
        print("Distance:", distance, "inches")
    time.sleep(1)
Code Breakdown
- Imports:
Pinfrom themachinemodule is used to configure the GPIO pins for Trigger and Echo.time_pulse_usis used to measure the time pulse in microseconds.time.sleep_us()is used to delay the pulse and give the sensor time to respond.
- Pin Setup:
- Trigger Pin (GPIO14): Set as an output pin, which will trigger the sensor to emit ultrasonic pulses.
- Echo Pin (GPIO15): Set as an input pin to receive the echo pulse and measure the time it takes for the sound wave to return.
- get_distance() Function:
- The function sends a 10-microsecond pulse on the Trigger pin, causing the sensor to emit an ultrasonic pulse.
- It then measures the pulse duration using the
time_pulse_us()function, which returns the time taken for the pulse to travel to the object and back. - The formula
(duration * 13558.2677) / 1000000calculates the distance in inches. The speed of sound is 13558.2677 inch/sec. Dividing by 1,000,000, converts microseconds to seconds.
- Main Loop:
- The program continuously measures the distance and prints the value to the serial port every second.
Uploading and Running the Code
- Open Thonny and connect your Raspberry Pi Pico to your computer via USB.
- Select the Raspberry Pi Pico as the interpreter in Thonny.
- Copy and paste the code into Thonny and upload it to your Raspberry Pi Pico.
- Open the serial monitor, and you will see the distance in millimeters displayed every second.
Troubleshooting
- If you don’t see any output, check your wiring and ensure that the Trigger and Echo pins are correctly connected.
- If the readings are inconsistent or always show 0, try adjusting the delay times or check if the sensor needs a stable power source.
Summary
In this beginner-friendly guide, we have interfaced the HC-SR04 ultrasonic sensor with the Raspberry Pi Pico to measure distance and output the result in millimeters through the serial port. By following simple steps to wire the components and write Python code, even those new to Raspberry Pi Pico can get started with distance measurement projects.
With this setup, you can integrate the distance measurement feature into various applications like object detection, robotics, and more. Happy coding!

